
Getting Started with GEOS
Surviving Your First 30 Minutes
This guide assumes you are setting up GEOS 2.0 on the C64 Ultimate (C64U), but you can run GEOS on a real C64, the C128, the Vice emulator, and even "The C64" (mini and full-size) from Retro Games Ltd.
In "The Very Second" collection bundled with the C64U, Commodore has included
.d64 images of a GEOS boot disk and several "swap disks" containing applications,
font files, and the original GEOS demo from Berkeley Softworks. I'll start with a brief tour
of the official boot disk and then take a look at one of the swap disks in the collection.
Along the way, you'll learn the importance of building your own GEOS boot disk, configuring RAM
expansion, and creating your first work disk.
For an authentic experience, let's begin with the typical system that a new user would have
had in 1988: a Commodore 64 with a single 1541 disk drive set to device 8. In the C64U's file
browser, mount and run the disk image GEOS Boot Disk.d64. If GEOS fails to
boot, I've listed some troubleshooting tips you can try.
BEFORE YOU START, I recommend you make backups of the disk images and keep the originals somewhere safe. That way, if you move or erase something important, you have an easy way to restore your disk images to a working state.
Enlarged Image
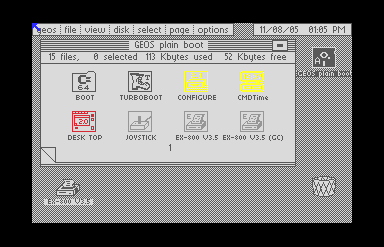
If you've successfully booted GEOS, it will load the deskTop application and you should see the first page of the desktop view. The main file window, called the "disk note pad", displays 8 file icons:
- BOOT: The loader, which must be the first file on disk to enable
LOAD"*",8,1to load GEOS. Even though this file is essential to getting GEOS up and running, the system considers this to be a "Non GEOS" file or "Commodore program". - TURBOBOOT: GEOS uses this fastloader to get started, although disk
access will continue to feel slow without a RAM disk. The system will report that this
is a GEOS file written in BASIC, but it can't be
LOADed andRUNlike a regular BASIC program. - CONFIGURE: This is an auto-executing application that loads the GEOS
drive configuration during the startup sequence. Version 2.1 by Jim Collette allows GEOS
to address up to 2 Mb of RAM expansion. When launched from the desktop by double-clicking
its icon,
CONFIGUREallows you to update your drive settings. - CMDTime: This auto-exec will set the date and time when a Creative Micro Designs (CMD) peripheral with a real-time clock is installed. This won't help much on a stock C64U, but the problem is actually worse: GEOS is not Y2K-compliant! We'll talk about the system clock in a later section.
- DESK TOP: deskTop is the default file manager. GEOS is often
inconsistent about capitalization and spacing in names—the filename is
DESK
    TOP
, but deskTop is the official name for the application. This is a "system" application, which in practical terms means you can't rename it or re-launch it by double-clicking its icon. - JOYSTICK: This input driver allows a joystick in Port 1 (or the Ultimate's virtual joystick) to control the mouse pointer. GEOS requires an input device; there is no keyboard input driver.
- EX-800 V3.5 and EX-800 V3.5 (GC): These printer drivers allow you to print documents on an Epson EX-800 9-pin dot-matrix printer. (There are dozens of printer drivers available online, and the Ultimate can be configured to use a virtual printer.) The (GC) stands for "geoCable", a parallel printer interface designed for GEOS.
Enlarged Image
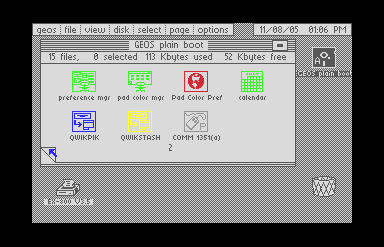
To see the next page of files, click on the "fold" on the bottom left corner of the disk note pad. After roughly 3 seconds, the view will update to show 7 additional files:
- preference mgr: The preference manager is a special type of applet called a desk accessory. Desk accessories can be launched from deskTop, but they are also available within other applications: you could open the preference manager while using geoWrite (provided GEOS has enough free disk space to save application state), update your preferences, and resume writing. The preference manager lets you set the date and time, system colours, and your mouse speed. You can even change the appearance of the mouse pointer by editing its sprite data. By convention, GEOS desk accessory files are named in all lowercase, but this is not a strict requirement.
- pad color mgr: This desk accessory lets you assign an icon colour to each distinct GEOS file type. Some of the default colour combinations have poor contrast, so choosing a palette for the disk note pad is a good way to improve readability.
- Pad Color Pref: This system file stores the colour preferences you have chosen with the pad manager.
- calendar: The calendar desk accessory acts as a simple day planner, allowing you to attach a brief note to any date you choose. Unlike the GEOS system clock, the calendar handles 21st-century dates correctly. This accessory takes over 20 seconds to launch on our stock system, which is frustratingly slow.
- QWIKPIK: The only application on this boot disk, QwikPik lets you choose files to copy to an REU. GEOS overcomes the C64's memory limitations by performing numerous disk swaps, so transferring commonly-used files to RAM enables a significant speed boost.
- QWIKSTASH: During the startup sequence, this auto-exec uploads the files you have selected with QwikPik to your REU.
- COMM 1351(a): This input driver supports the 1351 mouse and will not work with a joystick. Be careful when selecting an input device! If you find yourself with the wrong input driver, press C=+I to open the input device selector, and use the cursor keys to move the pointer and RETURN to click.
The geoWrite Swap Disk
You've seen everything the boot disk has to offer but can't actually do anything productive yet—with all the bootstrap files on a 1541-formatted disk, there's not enough room left over for applications and user data. To see how this limitation affects your workflow, you'll have to switch to one of the swap disks.
Locate the swap disk called GEOWrite.d64 in the C64U file browser and mount
the image on drive 8. Back on the desktop, click on the A-drive icon on the upper right corner
of the screen or select disk > open from the
top menu.
(You can also use the keyboard shortcut C=+O.) After a few seconds, the
disk note pad will refresh and you'll see some new files. There's no need to go through them
in detail at this stage, but here's a brief overview of the geoWrite swap disk:
Enlarged Image
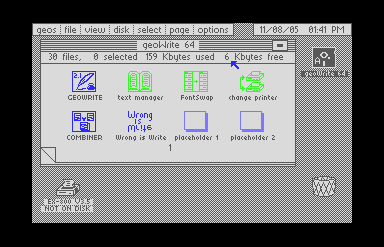
- Page 1: On the first page of the disk note pad, you will find the geoWrite word processor application, two additional applications, three desk accessories, and two placeholder files in an unknown format.
- Page 2: On the second page, you'll see an application called Text Grabber that converts common word processor files into geoWrite format, along with a number of format files for popular word processors such as PaperClip and SpeedScript.
- Page 3 and 4: The final pages are filled with font files. Berkeley Softworks included a handful of fonts with GEOS. Additional fonts were available through the purchase of "Font Packs" and hundreds more free fonts were created by the GEOS community. The file icon for the Arizona font has been replaced with a picture of a sheep; there are tools that allow you to edit GEOS file icons.
You're ready to launch geoWrite but first, take a look at the usage statistics on the information bar at the top of the file pad: 159K used, 6K free. That's not much space to work with, but it should be enough for a small document. Return to the first page of the file pad and double-click on the geoWrite icon.
After about 20 seconds, you're given the option to open an existing document or create a new one. There are no geoWrite documents on this disk, so create a new one by entering a filename and pressing RETURN. Feel free to type a few words into your new document and play around with the menu options. Changing fonts and applying text styles like bold and italics works much like it does on a modern word processor.
Not What I Remembered
Up until now, I've been showing you how to survive your first 30 minutes with GEOS, but I'd like to tell you about my first 30 minutes. My 25-year absence left me unprepared for my geoWrite session going completely off the rails soon after launching the app. I'll walk you through what happened so we can look at what went wrong and how to fix it.
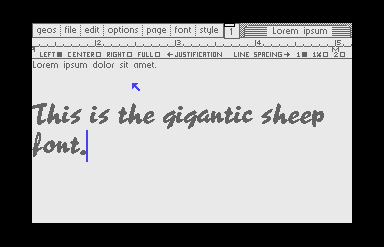
Because I am a traditionalist, the first thing I typed into my new geoWrite document was "Lorem ipsum dolor sit amet." For the next line, I switched fonts to Arizona 28-point. The font menu showed only 9 fonts even though there are 15 fonts on the disk note pad. Then I remembered: geoWrite is limited to the system font, called BSW, and the first 7 font files on the disk. (There's actually a desk accessory called FontSwitcher on this disk that lets you choose from additional fonts.)
Next, I typed, "This is the gigantic sheep font." At this point, my document consisted of 11 words and a single font change. I didn't see an obvious way to save my document, but fortunately quitting (choose file > quit from the top menu), automatically saves your work.
Enlarged Image

Enlarged Image
Enlarged Image
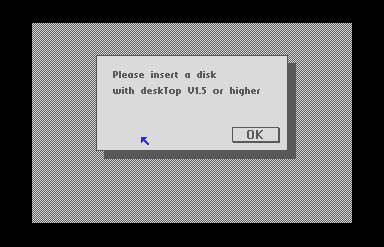
I immediately felt the limitations of my current setup when GEOS threw up a dialogue box:
"WARNING! Disk near full. Please move/delete files from disk to continue." The only option
was to click "OK", which opened another dialogue box with the message, "Please insert a disk with
deskTop 1.5 or higher." I couldn't continue until I had remounted the boot disk and clicked "OK".
It's tempting to think of deskTop as "just the environment" but it is an application in its
own right. In order to exit to deskTop, GEOS must be able to find the DESK TOP
file available on an active drive.
After the swap, I found myself back on the desktop, but now I had a new problem: GEOS could see the boot disk, but my "Lorem ipsum" document was back on the geoWrite swap disk. To move or delete files, I had to mount the swap disk again before freeing up enough space to continue. So I switched disks one more time, and on it went. It could have been worse: on the C64U, I'm mounting files chosen from a menu, but on an authentic system, I'd be removing and inserting physical disks with every swap, adding a whole new layer of complexity to the workflow.
What should have been a simple file management task had become an exercise in frustration. A tiny document had filled up what little disk space was available, forcing me into a series of warning messages and disk swaps before I could continue working. It's not hard to see why GEOS developed a bad reputation in the early days. The historically-accurate user's setup of a Commodore 64 with a single 1541 drive is not a reasonable working environment.
Fortunately, with the C64U, we're not limited to the basic system. It's obvious that we need to address two major shortcomings of the minimum setup: disk space, and program speed. In the next section, I'll show you how to configure a system with two drives and RAM expansion, and how to create your first productive GEOS work environment.
Troubleshooting Tips
The C64U is compatible with GEOS—in fact, even my own ancient GEOS 2.0 boot disk works when I load it from a 1581 drive attached to the C64U's serial port. If GEOS fails to load, there are a few things you can try:
- Verify that the
GEOS Boot Disk.d64disk image is working by mounting and running it in Vice on a modern machine. - Remove all peripherals from the C64U. It's possible that some external device is causing a bus conflict.
- Reset the C64U to its default configuration. (There are instructions in the manual.)
Conflicts may arise from unexpected sources—I found that a second SID chip mapped to
$DF00will keep GEOS from loading.
GEOS is notorious for having one of the most robust copy protection schemes of any software on the C64. Aside from the copy protection on the boot disk itself, GEOS uses software keys to "install" applications and connect them to your original boot disk. If the system finds a key mismatch, it may halt operation and force you to reboot. The disk images packaged with the C64U should all be unkeyed, but images you find from other sources (including your own ancient floppy disks) may run afoul of the copy protection.
Essential Disk Images
These disk images can be found on "The Very Second" collection bundled with the C64U. The
original .d64 files were originally prepared by Cenbe and made available at Lyon Labs.
-
GEOS 2.0 plain boot disk (
.d64) - geoWrite Swap Disk (
.d64)