
Customizing GEOS
Building Your Environment
For this guide, I assume you are setting up GEOS 2.0 on the C64 Ultimate (C64U) using the disk images on "The Very Second" collection and no external peripherals aside from an optional joystick. You can use the C64U's keyboard joystick emulation if you don't have a compatible joystick.
Note: This guide focuses on GEOS itself. I won't be covering how to use the C64U's file browser or configuration settings—those details are in the C64U manual and there are plenty of online sources that can show you how they work.
In the previous section, I showed why you don't want to run GEOS on a Commodore 64 with only one 1541 disk drive. In this setup guide, I recommend a simple, flexible setup that will allow you to experiment with GEOS on your C64U. This setup is not necessarily the best setup (advanced users will want something fancier!) but I think we should start with the basics. It will be much easier to troubleshoot issues that arise if we avoid additional complications.
Configuring Your Drives
Here is the setup I recommend:
- 1581 as device 8: The 1581 has almost 5x the capacity of the 1541 on each disk, so you're less likely to run out of disk space. After you boot from the 1581, GEOS will see device 8 as Drive A.
- 1541 as device 9: The 1541 may be the slowest drive with the lowest disk capacity,
but it still comes in handy. With a 1541 as Drive B, you'll be able to mount the GEOS disk images you
find online in
.d64format. - REU with 2Mb: Configure the REU as a virtual 1581 RAM drive as Drive C. You'll stash important components here and GEOS will use Direct Memory Access (DMA) to handle disk swaps, offering a considerable speed boost. Remember: anything saved to a RAM disk will disappear once you shut down. Always move your work to a physical disk (or disk image) before you end your session.
I'll cover the technical details of drive configuration in a later section.
Once you have the C64U configured, it's time to launch GEOS. Locate your copy of
GEOS Boot Disk.d64 and mount it on drive B (device 9). Exit to BASIC, and type
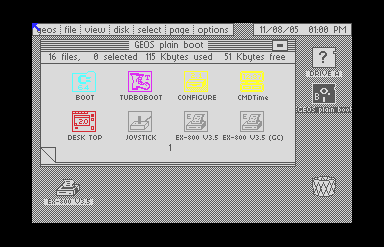
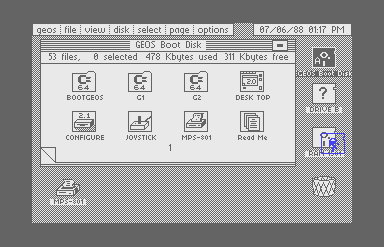
LOAD"*",9,1. Once deskTop has finished loading, you should see the screen in Figure 1,
displaying two drive icons—resembling floppy disks—to the right of the note pad. Drive A
(our 1581) shows a question mark, indicating that there is no disk in that drive; Drive B (the 1541,
highlighted as the current drive) is labelled "GEOS Plain Boot". Your next step will be to configure
the RAM expansion.
Locate CONFIGURE on page 1 of the disk note pad and double-click on its icon to launch
the application. (It actually took me a couple of tries to get the double-click timing right with my joystick.)
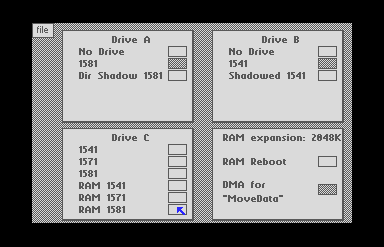
On the configuration screen, shown in Figure 2, you can see that GEOS has auto-detected Drives A and B as your
1581 and 1541. For Drive C, choose "RAM 1581" to give yourself a third virtual drive.
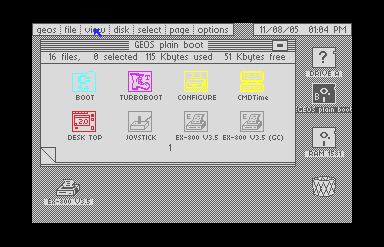
The RAM expansion input box shows "2048K", the maximum amount of memory that GEOS can see without additional modifications. Check the option for "DMA for MoveData" and leave the "RAM Reboot" option alone for now. In the file menu, choose "save configuration" and then "quit". When you return to the desktop, you will see "RAM 1581" as Drive C (Figure 3).
A New 1581 Boot Disk
The C64U's "plain boot" disk image is fine for
getting started, but the limited capacity of the 1541 will force you to change disks frequently. The 1581
takes care of the disk-swapping problem—you can fit the entire original GEOS 2.0 package on a single disk
with room to spare. But here's where we run into a new problem: you can't simply copy the C64U's boot disk to a
1581. TURBOBOOT is not 1581-compatible and will cause the C64U to lock up.
In 1988, you'd have two choices: live with the limitations of the 1541 boot disk, or connect with a user group or BBS to find someone who'd already figured things out. When I bought my REU from a guy in Toronto (we met at St. Patrick's subway station) he gave me a working 1581 boot disk as part of the deal. Even better, this disk included a fastloader that reduces the load time by roughly 30 seconds.
I've used that boot disk as a jumping-off point for a
new boot disk (.d81) that you can download and
use with your C64U. I've included all of the applications, desk accessories, fonts, and input drivers that came
with GEOS 2.0, and added two basic printer drivers to get you started. I've organized the files into logical
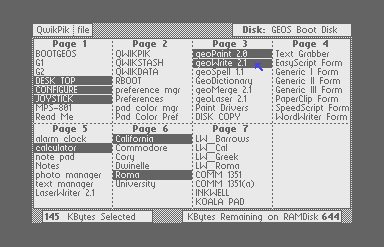
groups to make the disk note pad easy to navigate:
- Page 1: Boot files, deskTop, default drivers.
- Page 2: System utilities; configuration tools.
- Page 3: Core applications (geoWrite, geoPaint, etc.)
- Page 4: Text Grabber import tool and templates.
- Page 5: Desk accessories; LaserWriter printer driver.
- Page 6: Standard fonts.
- Page 7: LaserWriter fonts; input drivers.
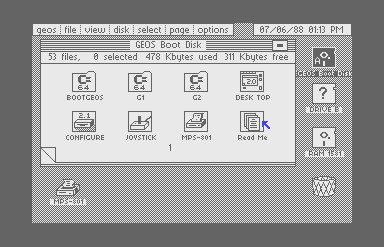
Restart your machine, mount GEOS Boot Disk.d81 on Drive A, and LOAD"*",8,1
to launch GEOS. After a moment, the screen will go blank, letting you know that the fast-load has
kicked in. After a few seconds, you'll see the message "QuikStash Copying to REU..." letting you know
that the QuikStash auto-exec is transferring files into the RAM disk. A few more seconds and
you should see the desktop, in the default monochrome grey (Figure 4). The whole boot process will take
just over a minute.
Taking Advantage of the REU
The C64's 64Kb of RAM is not enough to hold a full GUI operating system, application software, and user data. Even a simple application like geoWrite is too big for the available memory, and there's no way that geoPublish, weighing in at 96Kb, could ever fit. In order to overcome this memory limitation, GEOS performs frequent disk swaps. Any time you choose a feature from a menu, use a desk accessory, or even change pages in a document, GEOS may need to load code or data from disk, leading to constant small, annoying interruptions to your workflow.
An REU improves your experience significantly. When used as a RAM disk, the REU allows GEOS to perform virtual disk swaps at cartridge-port speeds, with a data transfer rate that is easily 1000x faster than the 1541 disk drive. If you copy application and data files to the REU, you can use it as a work disk, eliminating the wait time for disk swaps. Operations that redraw the screen, like scrolling through a geoWrite document, will still feel slow, but everything else you do will feel smooth. Just make sure you save your work to a physical disk (or disk image) before shutting down, because once the power's off, any work in the REU is lost forever.
Enlarged Image
Use the QwikStash application to transfer files to the RAM disk. To select files to copy, locate QuikPik on the second page of the disk note pad and double-click to launch it. You'll be presented with a list of all the files on the boot disk—select the files you want copied to the REU automatically when GEOS boots up. I've pre-selected deskTop and Configure 2.1 for you—you want to make sure deskTop is always available and Configure houses the disk drivers. In Figure 5, you can see that I've chosen to copy a handful of useful files; go ahead and choose as many files as you like—with a virtual 1581, you are not likely to run out of space.
Test your stash configuration by rebooting GEOS. To see what's on the RAM disk, you'll need to activate
Drive C. In GEOS, only two drives can be active, so getting at the RAM disk requires a drag-and-drop operation.
In GEOS, drag-and-drop is a bit different from what you're used to. First, single-click the RAM 1581
drive icon. Your mouse pointer will now include a "ghost" copy of the icon you clicked (Figure 6). Move the mouse
pointer up to Drive B and single-click again. GEOS will now see your RAM disk as Drive B, and you can browse this
disk by clicking its icon. You should see the files you selected with QwikPik on the disk note pad.
Your First Work Disk
The REU gives you blazingly-fast access to frequently-used files, but you'll also need dedicated work disks for your projects. Each work disk is like a project folder where you keep related tools, assets, and documents organized together. More importantly, you never want to save work directly to your boot disk. Corrupting your boot disk means rebuilding your entire GEOS environment.
Before creating a GEOS work disk, you must plan ahead. You may want to create a collage with geoPaint and photo scraps, or a simple two-column newsletter with geoWrite and the Paint Drivers application. The nature of your project will determine what files you need.
You can use the REU as a staging ground for your work disk. While the process I'm about to show you gets the job done, it's not particularly elegant. You'll find more streamlined tools (file copiers, and even alternative desktops) as you spend more time with GEOS. Before you start, make sure that GEOS sees the 1581 as Drive A, and the RAM Disk as Drive B.
Collect what you need by dragging and dropping files to the RAM disk. Take the time to consider what your project will need: applications, desk accessories, fonts, or any other resources. Make sure you have all the files staged up before moving on to the next step.
Enlarged Image
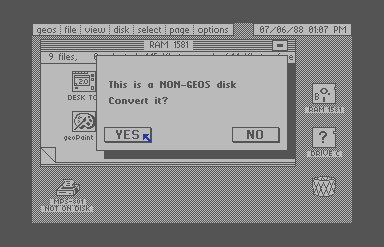
Use the C64U's file manager to create a blank .d81 disk image, and mount it on Drive A.
Click on the Drive A icon to launch the new disk. GEOS will say, "This is a NON-GEOS disk. Convert it?"
(Figure 7). Choose "Yes" and GEOS will prepare your work disk for use.
Now you can drag files from the REU to your new work disk. Once the transfer is complete, you have your first dedicated work disk ready for projects.
To give you an idea of how a typical GEOS work environment might look, I've prepared a
sample work disk (.d81)
with custom color preferences and files sourced from across the GEOS collection. I've included a selection of
fonts that are knock-offs of the original "world-class city" fonts that Susan Kare designed for the original
Macintosh. You'll see deskTop and Configure on my work disk—I always include these applications
because you never know when you might need them. If something goes wrong or you find yourself working on a
system with different configurations, having the core system files available means fewer interruptions.
You now have the basis for a productive GEOS environment. But here's something to think about: you've seen how much faster the REU makes file operations. What if your work disk files were cached in the REU too? You already have the tools to create project-specific stash configurations. Learning to take advantage of the RAM disk as a work space is your next step on the road to becoming a power user. I'll cover advanced REU management in a future section.
Essential Disk Images
-
1581 GEOS 2.0 boot disk (
.d81) - Sample work disk (
.d81)