
The GEOS User Experience
Muscle Memory Mismatch
A good user interface is invisible; it lets you do what you want without having to think about the mechanics behind it. Whether you're using a desktop computer or a mobile device, at no point should you be thinking, "I am using a machine." You click, drag, or swipe—these gestures feel normal. They're just a part of how computers work.
But it hasn't always been this way. Many of the conventions we take for granted took years to fall into place. If I told you C=+Z was one of deskTop's keyboard shortcuts, what would you think it does? If you said "undo", that's a good guess; CTRL+Z is such a common shorthand for "Oops" that it's practically a meme. But on the GEOS desktop, C=+Z means "open file".
It's not that GEOS is wrong or badly-designed—what we now think of as normal and standard simply hadn't been codified yet. We can't help but approach GEOS with our modern expectations and decades of muscle memory. When something doesn't work the way we've been conditioned to expect, suddenly we're very aware that we are, indeed, using a machine. Here are some of the ways GEOS caught me off guard:
Enlarged Image
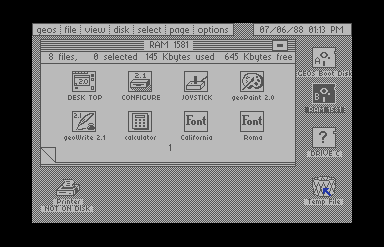
Trash Can vs. Recycle Bin
We're all used to deleting files by dragging them into a virtual trash can or recycle bin. On the GEOS desktop, deleting a file works much the same way but there are a few differences. The trash can holds only one file at a time, and there's no obvious way to empty it. If you click on the trash can, your deleted file will be "undeleted" and restored to the disk note pad. To get rid of your file for good, shut down or validate your disk. If you try to delete a file from a boot disk, GEOS will complain: "The operation requested may not be performed on a Master disk."
Enlarged Image
Undos and Autosaves
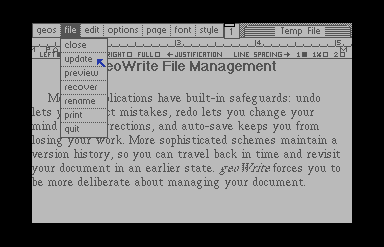
Modern applications have built-in safeguards: undo lets you correct mistakes, redo lets you change your mind about corrections, and auto-save keeps you from losing your work. More sophisticated schemes maintain a version history, so you can travel back in time and revisit your document in an earlier state.
geoWrite forces you to be more deliberate about managing your documents. From the file menu, use update to save your latest changes to disk; use recover to revert to the last saved version. There is no undo option, but the update/recover functions effectively give you a single restore point to work with. Get into the habit of saving your work every few minutes—geoWrite will only auto-save when you quit.
If you're working in the REU, you must transfer your work to physical disk before you shut down or you will lose everything. (And don't forget to back up your work disks every now and then...)
Enlarged Image
Interface Conventions
Many of the modern interface design patterns we expect to see aren't present in GEOS. Some things are simply different: you can't move or resize windows, and there are no scroll bars. Some things that feel like they should work just don't. My muscle memory tripped me up when I tried to rename a file—I clicked on the file name entirely without thinking. You can't even select a file by clicking on the filename; you have to click the file icon.
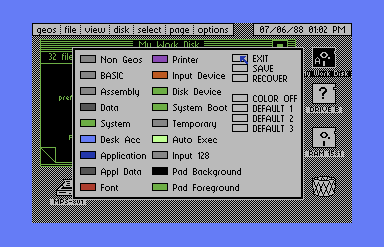
Other patterns are more familiar, but inconsistently applied, so they are not the same in all applications. Most windows have a "close window" control in the upper right corner, but the Preference Manager desk accessory windows do not. To close the manager window, you click on the exit control, but first you have to find it—the control is cleverly disguised as an input box.
Keyboard Shortcuts
Like their modern counterparts, GEOS applications recognize keyboard shortcuts. Some shortcuts do exactly what you expect: C=+P will print a file from the desktop, although geoWrite has no equivalent shortcut.
Other keyboard shortcuts aren't what we're used to. Familiar combinations can have surprising results: we'd expect C=+F to start a search, not format a disk.
Some shortcuts are ALMOST the same as their modern equivalents, setting an expectation that gets thwarted. In geoWrite, you use C=+X for cut and C=+C for copy, but C=+V isn't 'paste', but rather 'select page'. geoWrite treats pasting text and pasting images as two separate operations with two distinct shortcuts. Today, we don't give much thought to the type of data we paste into a document because a modern OS just takes care of it, but GEOS hadn't quite reached that level of abstraction yet.
The accompanying table lists a few deskTop shortcuts alongside their common modern interpretations.
| Shortcut | GEOS deskTop | Modern Standard |
|---|---|---|
| C=+O | Open Disk | Open File |
| C=+Q | Display File Info | Quit |
| C=+Z | Open File | Undo |
| C=+F | Format Disk | Find |
| C=+A | Switch to Drive A | Select All |
| C=+N | Rename Disk | New Window or New File |
| C=+W | Select All Disk Note Pad Pages | Close Window |
GEOS comes from a time when graphical user interfaces were still a new idea. Many of the things we think of as normal hadn't been worked out yet, so the experience can seem a little strange at first. But after a while, you become accustomed to a different way of doing things, and start training new muscle memories. C=+Z stops feeling weird and simply becomes a way to open files. You no longer have to think about the mechanics behind what you are doing; it just becomes part of how the computer works.